Making the move from Blogger to a self hosted WordPress can seem a little daunting if you don’t know where to begin. Some web hosts offer services that can cost upwards of $200 to complete this task for you, but if you take the time and follow this guide, you can absolutely do it yourself!
A seamless transition is important when you’ve got visitors stopping by your site. You don’t want them to see any “work in progress” or “under construction” downtime, instead, you want to be able to do the move behind the scenes and simply launch the new WordPress site when it’s ready. I used the following steps below to make the transition of Wonder Forest from Blogger to WordPress virtually error free and seemingly instant (to those who couldn’t see what was going on in the background!). A lot of you have asked me to share how I did this, so I put together this step-by-step guide to walk you right through it!
Before you begin
Before you jump into this, you need to set up web hosting. This is where your new WordPress site will be installed and all of your blog content kept. I recommend using Bluehost, the same company I use for my own blogs, because they are highly affordable and you will also get a killer deal at just $2.95/month (paid annually) if you purchase through my site. Click here to sign up for web hosting to get started. (note: this includes an affiliate link so I am able to offer you this exclusive price)
Click on the green Get Started button on their site to choose your hosting package. After choosing your hosting package, you will see this screen:
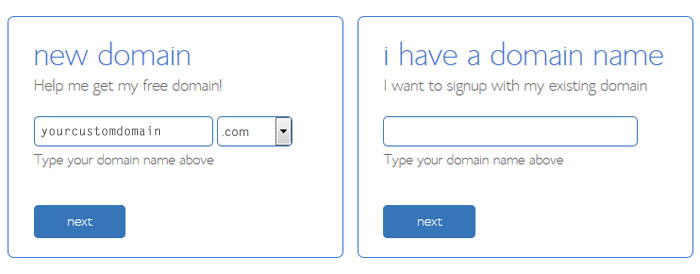 If you’ve been using Blogger with a custom domain already, you won’t need to register another one when you sign up for hosting. Instead, you’ll choose the option to use an existing custom domain name. If you don’t have a custom domain already, you will get a totally free domain name here, just enter it in the New Domain field and continue through the registration process. They will check to see that it’s available, and if not you’ll have to choose another. If you already have a domain name through another provider, use the form on the right instead.
Immediately after signing up, your account should be created. You will receive an email from Bluehost to confirm and you are now able to access your account where we will set up WordPress in a snap!
Installing WordPress
Once you have your account information, sign into your Bluehost account through the control panel.
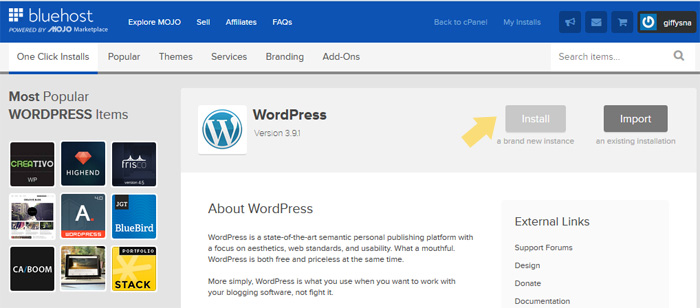
Find the option in your control panel that says Install WordPress and click the icon to start the process.
On the next page, choose Install:
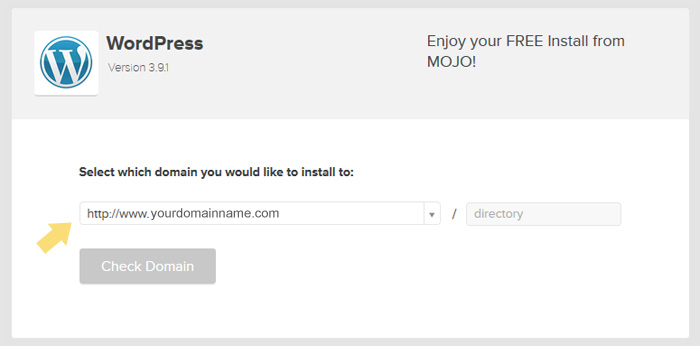
Select the domain you want to install WordPress to. This should by default be your domain name you registered during signup. You can leave the “directory” box blank to install into the root of the site, or enter a folder name, like “blog” to install into a “blog” directory. That means that your blog would be accessed through www.yourdomainname.com/blog instead of just www.yourdomainname.com.
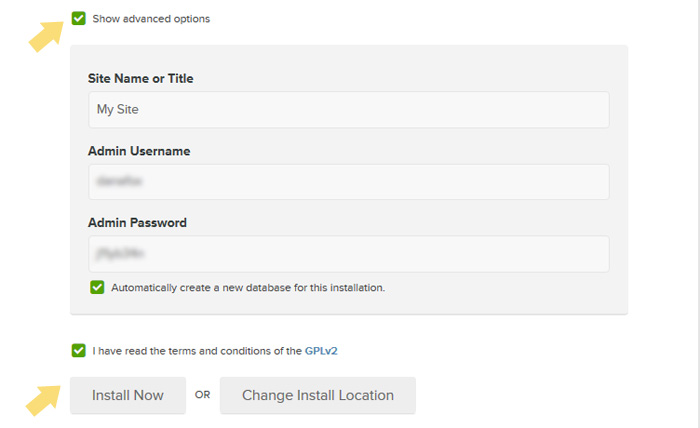
Select “Show Advanced” and enter a blog name and your admin login credentials. You will use these to login to WordPress to post. Choose something other than “admin” for security purposes.
Click Install Now and WordPress will install to your account.
If you are using the same custom domain that you’ve used on Blogger, you will need to use a temporary URL to work on and access your new WordPress site as it will still currently be active on your Blogger site. Otherwise, if you’ve signed up for a new domain through Bluehost, you can just work with that URL as there’s no need to do anything “behind the scenes” when nobody knows your new URL yet! You can skip down to “Making The Transition” if this is you.
Configuring WordPress and Temporary URLs
Your login page for your WordPress dashboard would normally be www.yourdomainname.com/wp-admin, using the username and password you chose during install, however, if you’re using the same domain as you’re using on Blogger, this URL won’t work yet as it’s still attached to your Blogger account and you’ll likely get an error page trying to access it. Instead, you’ll need to use your temporary URL which we will find now.
If you go back to the main page of your Bluehost control panel and click on cPanel at the top, you will see some information in the sidebar. You may need to click on the “Expand Stats” link.
You want to find the “Shared IP address” line which will look something like 69.195.124.111 (although it could be different). This IP address is the location of your site on their server. To use your temporary URL, you would simply use the IP address and your Bluehost username that was emailed to you when you signed up. You can also see this in the same sidebar panel under the “Username” heading. The URL you create with this information should look something like this, with a swirly hyphen before the username:
http://69.195.124.111/~yourusername
You’ll need to set this URL as your WordPress Home URL and Site URL so you can access your WordPress dashboard properly. To do that, in your Bluehost cPanel still, click on the File Manager icon.
- A popup will appear before it launches. Select “Document Root For – your domain name”
- You should see a file called wp-config.php. Click on that then click Edit at the top.
- Add the following code on a new line directly after <?php at the top:
define('WP_HOME','http://69.195.124.111/~yourusername');
define('WP_SITEURL','http://69.195.124.111/~yourusername'); - Be sure to use your OWN temporary URL that you figured out a moment ago.
- Save the file
Now, to login to your WordPress admin dashboard, you’d just use the temporary URL instead:
http://69.195.124.111/~yourusername/wp-admin
This temporary URL will allow you to make edits to WordPress before launching it.
Making the Transition
Now you can start making the move from Blogger to your new WordPress site! First, you’ll want to update your WordPress permalinks to match the way the links of your posts are formatted in Blogger. This simply means that if somebody visits a blog post of yours at www.yoursite.com/2015/10/name-of-post.html, they will not receive any “Page not found” errors due to the URLs being different on WordPress.
- In your WordPress dashboard, go to Settings then Permalinks.
- Choose the Custom Structure option and in the textbox enter:
/%year%/%monthnum%/%postname%.html - Save the settings.
Importing Blogger Posts
Now you’ll want to import your Blogger posts, images, comments, and more.
- In your WordPress dashboard, go to Plugins then Add New
- Search for the “Blogger Importer Extended” plugin and install it. Activate it when it’s installed.
- Start the importer (Plugins > Blogger Importer Extended “Start” link under the title)
- It will ask you to login to your Blogger account and authorize access. Do this then choose the blog you want to import.
- Follow through the steps to import your content. Depending on the amount of content you have, it may take a while.
Fixing Permalink Errors
Next, you’ll want to install another plugin that will help fix any permalink errors resulting in “page not found” issues.
- Click here to download the Maintain Blogger Permalinks plugin.
- Go to Plugins then Add New and then Upload Plugin
- Upload the .zip file you downloaded and activate it
- Under Tools, Maintain Blogger Permalinks, click the button that says “Maintain Blogger Permalinks”
- That’s it! Deactivate the plugin and you can delete it if you like as well.
Redirecting old Blogger URLs
Since Blogger uses a different URL structure for pages than WordPress does, you’ll need to set up custom redirects for any pages you have set up.
- In the dashboard, go to Plugins then Add New
- Search for “Eggplant 301 Redirects” plugin, install, and activate
- Under Tools > EPS Redirects you will enter the pages you want redirected
- Type the original Blogger URL structure (for example: “p/about.html”) and redirect it to your newly imported WordPress page with matching content.
- Save.
Removing Blogger Mobile Extensions
Finally, you’ll want to redirect the mobile Blogger URLs to your WordPress site. Since Blogger uses the extension ?m=1 at the ending of any mobile link, accessing the same link in WordPress will result in an error page. We want to tell WordPress to remove that extension and redirect it to the proper (non-mobile) page instead. Assuming you have a responsive theme. this should work great for you.
This step requires you to edit your .htaccess file on your server. You can find this file by logging into your Bluehost control panel, selecting cPanel at the top, and then launching the File Manager (under File Management).
- A popup will appear before it launches. Select “Document Root For – your domain name” and be sure to check “show hidden files”,
- You should see the .htaccess file there. Click on it and then choose Edit.
- Directly above the “# BEGIN WordPress” line, insert the following lines of code:
RewriteEngine On
RewriteCond %{QUERY_STRING} ^m=1$
RewriteRule (.*) $1? [R=permanent] - Save the file.
When you are ready to launch
Once you’re done customizing your blog and getting everything looking great, you’ll want to launch it! First, take your blog out of maintenance mode if it is in it. Sometimes a new install automatically puts your blog into maintenance mode and you have to “activate” your site to make it live. You can find this toggle option in your settings.
If you used a temporary URL to build the site, you’ll now want to change the WordPress default URL to your custom domain. To do this, simply remove the two lines of code you previously added to wp-config.php (see above).
The next step for you is to set the nameservers of your domain name to Bluehost to move it away from Blogger. Login to the place where you originally registered your domain name and find the page that allows you to edit the DNS or the Nameservers. You’ll want to remove what’s there (reset it if you can) and then enter the new nameservers. For Bluehost they are:
NS1.BLUEHOST.COM
NS2.BLUEHOST.COM
DNS changes can take up to 48 hours to apply, so keep checking your site URL to see if the switch has happened.
If you didn’t have a custom domain before this and were using a blogspot URL, you will want to instead redirect your blog to your new domain. To redirect visitors from your Blogger blog to your new custom domain WordPress blog, go to Plugins and Add New. Search for Blogger 301 Redirect and install the plugin. Activate it and follow the instructions in the plugin to set up your redirection.
Migrating Disqus comments to WordPress
- Install Disqus WordPress plugin and set it up
- In your dashboard go to Comments > Disqus > Plugin Settings (top right).
- Under Import and Export click the Sync Comments button
Note: You’ll want to be sure your permalink structure is the same in WordPress as it was in Blogger or Disqus comments might be missing from posts. If you completed the steps above, all should be good.
I hope this guide as helpful and you were able to easily transition your blog from Blogger to WordPress without issues!
Last Updated on

Great guide! I have faced the prospects of moving from blogger to WP so many times in the last eight years of blogging but have not yet done so. I even have a carcass of a WP blog hanging empty… The thing is, I am still to be convinced that I need to host my own site instead of a blogger with my own domain. I don’t see any benefit. I mean, I don’t love google or the poor tools of the blogger platform, but their are pretty efficient and simple and I can focus on content and pictures. Why should I move? Plus I hate this disqus comment thing, what the benefit of that?
Thanks so much for this guide, Dana. I finally transferred to WordPress because of this. I’m currently waiting for the next 48 hours to see if it went well. I’m really nervous. Wish me luck!
Dana! This was so helpful I made the switch last night using this guide and by morning my servers had switched over and everything is working perfectly! I just have one Q: Do you have to do anything with regards to Bloglovin? Do you just paste the same widget and everything works as normal or do you have to claim the new WordPress blog on your Bloglovin account?
Thanks for this really helpful guide, I could not have done it without you!
http://abigailalicex.com
You know guys, I tried this automated migration tool: https://cms2cms.com/
Maybe you’ll find this helpful too. It saved my time a lot