
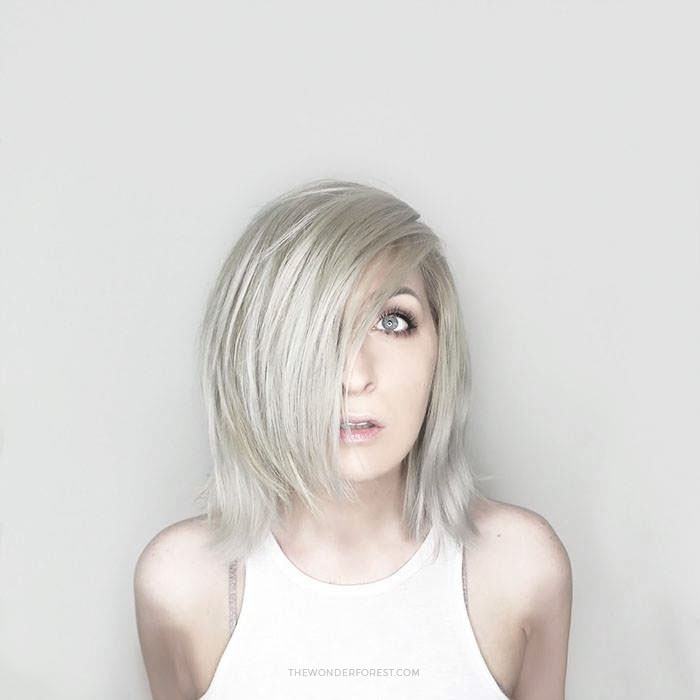
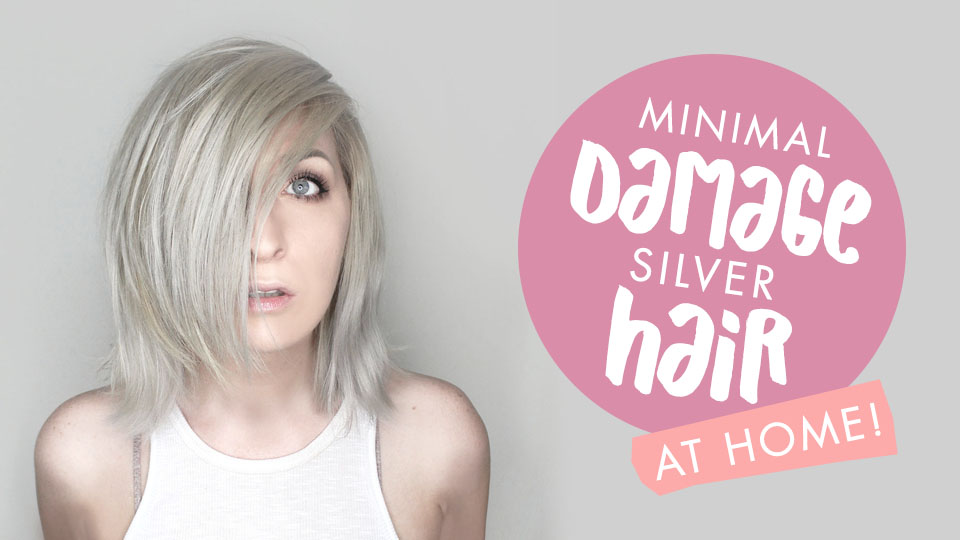
If you were wondering how to dye your hair silver or grey at home, you’ve come to the right place! This popular hair color looks great on every skin tone and also works well for a gray hair transition.
Gorgeous silver locks had been a goal of mine for a little while, and after much experimenting and finally achieving the look I wanted, I thought I’d throw together this little guide for those of you that are interested in doing the same thing.
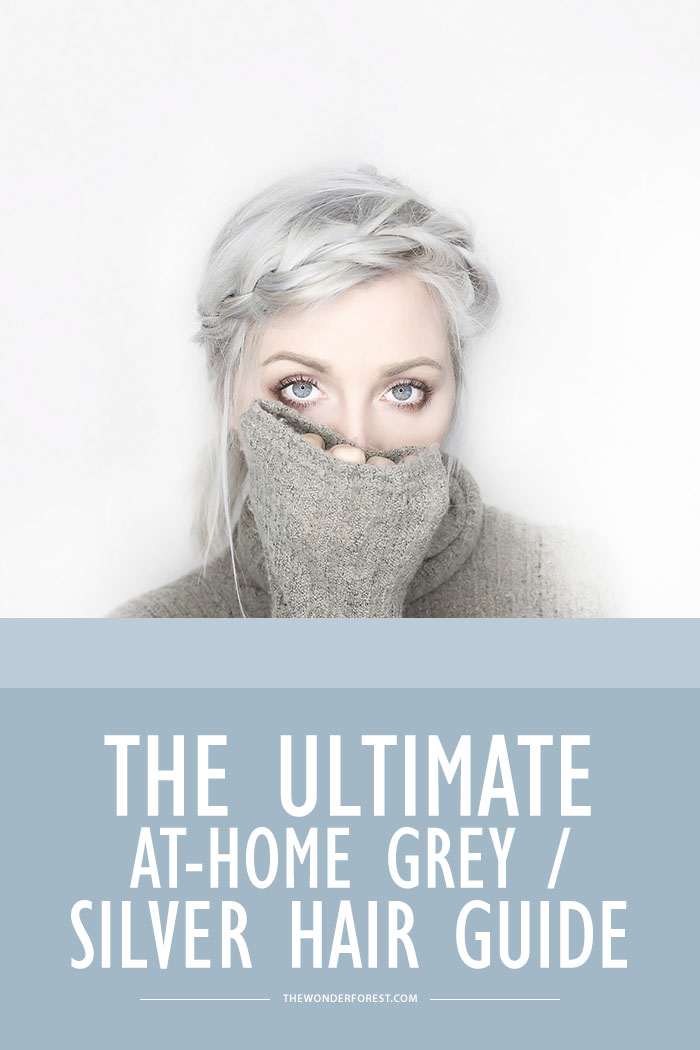
Disclaimer: I am not a hair stylist or professional. This guide is used for reference only and contains steps and products I’ve used to achieve silver hair without a salon.
Before you begin…
It’s important to note that silvery hair requires extra maintenance. Personally, I’ve never had to do as much up-keep on my hair as I do now that it is silver.
Silver hair is a pretty demanding hair colour, so make sure you’re ready to take on the responsibility before moving forward! By demanding, I mean that you can’t skip on root touch-ups and toning sessions. Once your hair has grown no more than 1cm, it’s time to repeat the whole lightening and toning process to ensure that you don’t get any banding effects.
If you’ve never dyed or bleached your own hair before, I recommend getting this done at a salon so you can be sure that it’s done properly with minimal damage. If you have black hair or dark hair, it might take a couple of sessions to get to the proper lightness before you become a silver fox.
You can even take notes at your salon and ask your hair stylist questions if it’s something that you’d like to attempt in the future. If you’re comfortable with lightening your hair and are ready to take the plunge and dye your hair gray or silver on your own, keep reading.
Bleach, bleach, bleach!
Unless you were born as a natural level 10 blonde hair shade, you simply can’t achieve this colour without bleaching your hair to the lightest level possible.
The silver hair color simply won’t appear to be that lovely icy tone otherwise, so starting with super light level 10 hair is the first step in achieving this grey hair shade with cool tones.
Take a look at this chart below to determine your current hair colour level. Match the colours as closely as possible with your natural hair color to determine which level you are on a scale of 1-10:
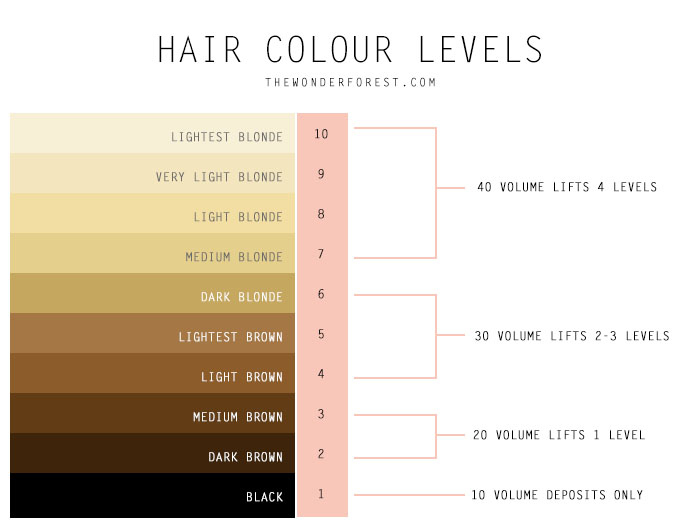
Depending on your natural hair color or current color-treated hair color, you may have to complete the lightening process multiple times over a period of time. For example, if you are a current level 3, you will only be able to lighten your hair to a level 6 with a 40 volume developer in one session, as a 40 volume lifts 4 levels. Don’t try to do multiple bleaching sessions back to back because you will risk your hair being seriously damaged!
For a complete technical guide on how bleaching works and how I bleach my own hair, check out this post.
This process shouldn’t be taken lightly. You can seriously damage your hair or cause bleach burns on your scalp if you mess up or don’t do proper research first.
Hopefully my guide to bleaching your hair at home will help you through that. I highly recommend you head over there and read it then come back here. Okay, let’s continue!
Obtaining a Silver Hair Tone
I can’t say it enough, It’s important that your hair reaches the lightest possible level before attempting to go silver. Your hair should should resemble that of the inside of a banana peel.
Be aware here that you’re going to be stripping down the colour of your existing hair, which can leave it brittle.
I suggest stocking up on some deep conditioning treatments, Olaplex, a hair mask, or leave-in conditioners to aid in the repairing process and to leave your hair shiny instead of dull and dry. A proper hair care system can keep your locks looking great.
Tone it, baby!
After your hair is lightened, it might look quite yellow and unattractive after that bleaching session. That’s totally normal. However, if it’s leaning more on the orange side as opposed to yellow, it’s not yet light enough.
If your hair has reached the proper lightness, the toning process is what will kill those yellow hues, and killing those hues is a must for this silver/grey look.
You can use toner, dye, or both depending on your taste. Let’s talk about toner first.
You’ll want to go with a purple or violet based toner, like the Wella T18 Lightest Ash Blonde toner. I always use this product with a 5 or 10 volume developer instead of the 20 they recommend on the bottle, simply to save my hair from even further damage.
With a 5 of 10 volume, it’s not going to lift the colour any more, but instead just deposit the colour/toner onto your hair and get rid of those brassy tones. If you’ve achieved the lightest shade already, there is no point in trying to lift it anymore anyways.
You will apply the toner using the bowl/brush technique and following the instructions that come with it. Normally this is a 1:1 ratio of toner and developer, but some brands can vary. Information about this can be found in my guide to bleach lightening.
Apply the toner and leave this on your head for about 20-30 minutes. Keep checking your hair throughout the process. When finished, wash it out with shampoo and then condition it well.
DIY Toner Option
Another option, although not as permanent, is to create your own semi-permanent hair color DIY toner which will not cause any damage to your hair as it doesn’t need a developer, but note that it doesn’t have the same staying power as a permanent developer-based toner or dye. It is a vegan formula that will help keep your silver strands looking awesome and can be repeated whenever your hair starts to look brassy.
You would apply the DIY toner with a bowl and brush just as the regular toner and can repeat it whenever your hair starts to get brassy.
That’s usually all there is to it and toning your hair may just get you to the grey shade that you wanted without any additional dye, but if you want something darker or more vibrant, a silver/grey coloured dye is the way to go instead of a toner.
Note that if you used my DIY toner tutorial, it acts as a semi-permanent dye and you don’t need to do anything else!
Silver Dyes
As I explained above, sometimes you don’t need to add additional silver dye after bleaching and toning your hair. You can make this judgement for yourself based on your results. A great toner is usually all you need and a lot of them now come in icy silver shades.
I’ve had toning results that didn’t exactly get me as silver as I would have liked, so added a semi-permanent violet based dye on top. This ensured that I achieved the proper shade I wanted, but without the added developer causing damage to my hair.
I’ve tried a couple of direct silver gray hair dyes, and the best one so far has been the Pravana Chromasilk Vivids in Silver. It is a longer lasting semi-permanent colour which requires no developer, which means no damage to your hair as there is no peroxide. It’s a great way to get the look without the worry of breakage.
For the application method, you will apply this directly from the tube with a brush and bowl just like the bleaching process.
There are a couple of ways you can use this product depending on the shade of grey you want to achieve. You can empty the entire tube into your bowl and apply it as is for a darker steel grey colour, or you can dilute it (like I do) for a lighter silver colour.
To dilute it, first fill your bowl with a bunch of budget friendly conditioner and then add some of the Chromasilk colour. I added about half of a tube to 3/4 a cup of conditioner for my light silver shade. Mix it up and apply it just like you would with the brush.
To help put things into perspective, I created a video showing you how I touch up silver hair and create my DIY silver toner. Watch it here:
Silver Hair Care Tips
Silver hair is probably one of the most difficult colours to achieve and keep. It tends to fade rather quickly, so you’ll want to stock up on some products to help maintain the shade.
- One of my favourite tricks is to use this Roux Fanci-Full Rinse in Silver Lining in between dye jobs. It is a temporary hair colour rinse that you apply to damp hair and it lasts until you shampoo it out. It is also an awesome product for gray roots if you’re a natural gray. If you’ve trained your hair to only need a washing every few days, this is a great product for a little ‘pick-me-up’!
- Shampoo your hair every few washes with a purple based colour correcting shampoo like Shimmer Lights by Clairol or if you’re in Canada, the Ice Cream purple shampoo you can get at Shopper’s Drug Mart is AMAZING. This will help to keep the yellow tones at bay while your colour fades. If they start creeping up on you, try my at home DIY purple toner.
- To keep your bright silver color hair looking healthy, use a deep conditioning treatment once a week. Remember, the less you wash your hair, the longer the colour will last.
- Tackle those roots! You don’t want to let your roots grow more than a centimetre because you will be causing more hassle for yourself. It’s much easier to bleach regrowth that is this length because the risks of unwanted banding (seeing a line where the new bleach/old bleach begins) is lessened. When you are ready for a re-dye, just concentrate the products on the roots and not on your pre-lightened/dyed hair.
- If you’re using a normal shampoo, grab one without sulfates as they will strip the colour out slowly. Most shampoos “for coloured hair” should work, but keep in mind that it WILL still fade regardless of the shampoo you use.
- When you lighten your hair and rinse out the bleach, always wash it with shampoo but leave out the conditioner if you are going to tone it afterwards. Conditioners can close the cuticles of the hair, adding a barrier for the toner to penetrate.
I hope this guide helps you in your silver hair colouring journey! Good luck and be careful!
Last Updated on
Yes! Thank you for this- I’m definitely bookmarking this. I’ve wanted to change my hair for so long but can’t afford salons for more than anything but a trim.
Lipstick Theory // Student Cruelty Free Lifestyle Blog
They are pretty expensive, I know! Hope this helps 🙂
hi, im quite confused about the toner?ryt now ,i only have violet color correction?what do you think.its that possible?
Your hair looks gorgeous! I’ve always wanted to dye my hair grey some day. Thanks for sharing this 🙂
http://www.raiin-monkey.blogspot.com
Thank you Raiin! 🙂
This is such a stunning colour – I’ve been tempted to go silver for a while now, but just not sure I’m ready to commit just yet! x
Small&Blonde♥
You should totally try the Roux Fanci-Full stuff I mentioned in the Care and Tips section. You could try out the colour with no commitment. 😉
Although I love that hair colour, I would never take a risk and bleach my hair. My hair is so dark that it would damage it so, so much!
Love out it looks on u x
http://www.thelisasworld.com
I love your hair! This is definitely goals for me, but I’m working my way up to silver!
Jessica
http://blendedintoone.blogspot.com/
That color looks great on you!
Thanks!!
Oh wow this suits you so much, I don’t think this would suit me which is a shame as I love the colour!
Meme xx
New Post:
Beneath the Surface by Heidi Perks Book Review
http://www.thedayinthelifeof.co.uk
Thank you!
How often did you have to refresh your silver hair? I’ve been wanting to do this for a while but just not sure exactly how big of a commitment it is!
It really depends on your own hair and how well it can hold colour and how often you wash it. Mine is terrible with holding it in so it lasts about 5 washes (I wash it every 2-3 days) before I need to add a little of the silver rinse back in or re-tone it. I hope that helps.
I love your makeup too! It complements your eyes and your hair. What eyeshadow is this?
I love the shade you got. You said that you used 3/4 cup conditioner to make the shade, but for how much hair dye are we talking the whole bottle?
Hi I was hoping to be able to buy silver dye at a store. Any suggestions on which ones work well that I can buy from a store?
Question: I’m about 55% white and 45% medium brown and am seriously sick of looking at it — it looks horrible — so I’m wanting to dye it just ONE color. Since most of my hair is white I was thinking grey/silver. I guess my question is, if I need a hardcore bleaching process to eliminate the brown hair, how damaged is my hair going to be when finished? I’d never do it myself so I’m going to a salon but I tend to keep my hair pretty short (2-4″)…am I going to have any problems going silver or grey from my aforementioned starting point?
My hair was bleached 2x in a row in January – and toned silver. I’ve been using Clairol Shimmer Lights shampoo and conditioner – but the silver has been long gone so my hair has been steadily turning a brassy blonde again. I just bought the T18 and developer like you mentioned in your article – and it turned out SO pretty!! I ordered the Pravana from Amazon so I should be able to add that next week as well. Thanks for the article, it helped so much! I was worried I’d have to go spend a ton of money at a salon to get this look again.
This is a great article! Question: I’m looking for a silver color with a slight blue undertone. Could I also Purchase Pravana dye in a blue color and add a little to the silver to achieve a slightly blue-ish silver?
You could try that. You could also use Blue Steel by Manic Panic. It is a blue toned grey… only use a little bit mixed with the conditioner by following my tutorial here: https://www.thewonderforest.com/2016/01/brass-banishing-diy-hair-toner-for-blondes.html Good luck!
Wow your hair looks so pretty! I actually just dyed my hair a few days ago but it didn’t turn out right, and I just want to go grey! How long after dying my hair do I have to wait to start the bleaching process? My hair is about an 8, it’s pretty dark, but I’d like to keep the roots dark and just fade into an ombré look with the silver.
Was a brunette with gold highlights; bleached to yellow tone with Pravana bleach, used silver T-14 toner, then used Vivids Silver Chrome – the Silver Chrome came out sorta blue which I was able to eliminate with shampoo and peroxide. Thereafter I have used other silver dyes but have found my roots to be color resistant. My roots mostly retain a blonde to light brown cast which I really don’t like as it reminds me of dirty grey hair. Considering ombre but am a little scared to do that myself. Any suggestions about getting rid of that yellow color or how to kill the color resistance I am experiencing?
Could try bleach bath on the roots. Equal amount of bleach, developer (10 or 20 vol NO MORE) & shampoo. Just apply to stubborn roots after bleaching first time and leave on for normal bleaching time checking every 5 mins to make sure it’s developing without breakage. Then wash out and condition. Leave for a day at least b4 toning.
Hey so I followed this to the T and when all of it was finished, most of my hair remained the very light blonde with a slight grey tint and only a few strands were the silver I was going for. Any ideas on how I might have messed up? I am naturally blonde, and a very light one too. Bleached it a little bit to the correct shade then toned it, then put 3/4 cup conditioner with half the dye and let it sit for 30 minutes. And it pretty much came out platinum with a few silver streaks that are barely noticeable. Still pretty, but not what I wanted.
Did you comb it through once applied
I was actually looking for some hair color ideas but this doesn’t have much. I pinned some here if anyone is interested https://www.pinterest.com/annaRD19/silver-hair-color-ideas/
Hi Dana, I was wondering if you could help. So I lightend my hair, did the toning, then attempted to dye, using the extact products your recommended (and also reading both articles), but my hair came out purple. Don’t get me wrong, it was a cool purple, just not what I was going for. Any advice as to what I might have done wrong?
Grey hair sure looks good on some people