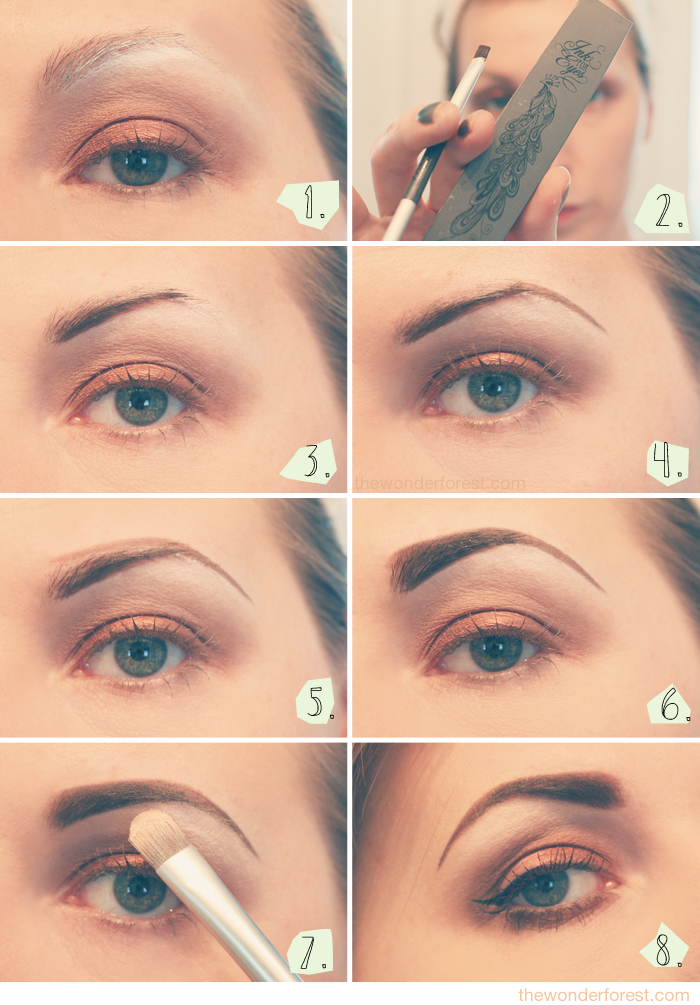
Naturally, I have really thin, awkward eyebrows. They stop about where the arch is, so to complete any makeup look, I always have to fill them in. I have tried tons of products from pencils to eyeshadow (my second fav choice), but for the past few months I’ve been using something a little unconventional and it’s been my go-to product. Scroll down to learn about it and follow the steps!
1. I first use my NYX Jumbo Eye Pencil in Milk to draw a sort of guide line underneath my brow. This also helps with highlighting later on. Draw it on, and then blend it in with your finger.
2. My unconventional eyebrow product: Urban Decay’s Ink for Eyes. It’s actually a cream eyeliner but I love the shade and how smooth it glides on, for that perfect crisp line. The colour I use is called Demolition. It comes in a little case with an angled brush. You can also use any matte eyeshadow or cream liner in a pot to complete this look, but the angled brush is key!
3. Start by creating a line underneath your brow up to the beginning of your natural arch. By starting underneath, we can make the brow look a little higher when we add some bulk to the top.
4. Draw another line from the top of your arch to the end. If you’re familiar with the brush ruler trick, if you hold a brush from the outer corner of your eye to the side of your nostril, this is where the line should end.
5. This step looks a little funny, but is where the bulk of your brow comes from. I like to make mine a little thicker than they naturally are. Draw a line above your brow and connect to your arch.
6. Fill in the blanks! Once you’re done, you can take a Q-tip and carefully blend out any harsh lines. Another trick is to take some concealer on a brush and go around the top of your brow to make it a little sharper.
7. Finish by brushing on a white shadow for highlight, directly underneath the brow.
8. Voila!
p.s. I’m featured on Makeup.com today!
Last Updated on


