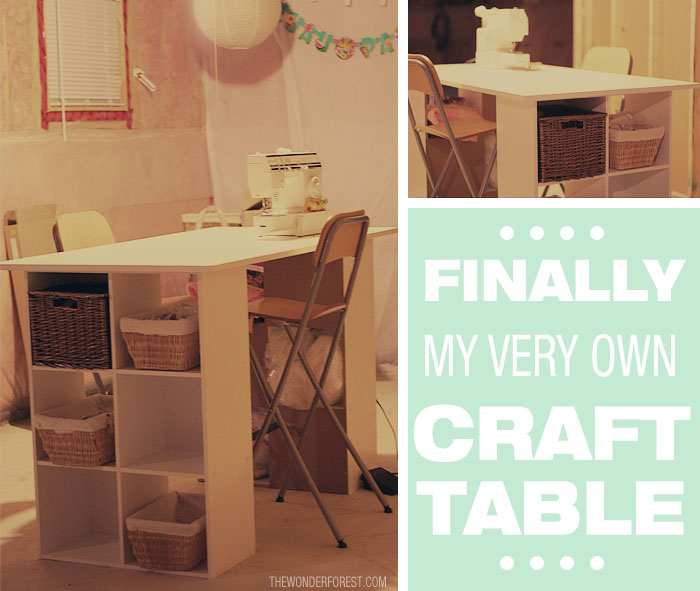
Crafters, you know the struggle — too many supplies, not enough storage. While there are plenty of craft room organization tips, sometimes you also need a place to actually do the crafting.
I made a vow to myself to finally get a craft table on the weekend. Whether it meant buying one or making a DIY table, I was bound and determined to make this happen. I’ve had my craft supplies scattered around the house, in every closet imaginable for far too long!
After searching for a proper table that would do, I wasn’t able to find anything pre-made. Ding ding! Genius idea alert! I found these cube organizer shelves and at that moment I knew what I had to do. I was going to make my own DIY craft table using these babies as the base.
Best height for a craft table
It just so happened that these were the perfect height… about 36″ tall which would make my craft table about counter-height.
If you want to stand while crafting, this is a perfect option. You can also pull up some bar-height stools to the table when standing isn’t an option.
How to construct a craft table out of shelves
These shelves were also already white so I knew I wouldn’t have to paint anything (I had wanted it to all be white).
I also grabbed a standard pre-cut melamine white coated board (again, no painting yay!), size 30″x60″.
You can get these at your local hardware store or Home Depot, usually cut to this exact size. If not, you can ask them to cut it… however, the edges won’t be finished like a pre-cut piece is. The storage shelves were 24″ wide so this would allow for a 3″ overhang.
The assembly of the shelves was super easy. All you need is a hammer and a screw driver. If you’ve ever put furniture together, you know how it goes.
Once finished, I could pop the table top on. First I measured a 3″ overhang on all sides of the underside of the tabletop with a pencil. This would allow me to easily line up the top of the shelves with the lines on the underside of the table. I’m smart 😉
I also added the backings that came with the shelves in a checkerboard pattern, just because I liked it that way.

I was very adamant about there not being ANY screws going through the top of this thing. I didn’t want any signs of a make-shift table.
You’ll want to use screws that are just a little longer than the depth of the top of the shelving while not so long that they will pop through the tabletop. Screw through the bottom of the shelf top and into the bottom of the tabletop to secure.
I believe the screws were 1″ screws, which worked perfectly because the top of the shelves were half an inch thick, and the table top was about an inch thick. Anyways, it worked very well.

My table ended up being 5 feet by 2.5 feet…. and I absolutely love it! (don’t mind my ugly unfinished basement… I’m working on it!)

This whole project cost me $130. Which is more than I wanted to spend, but less than any other table this size would cost retail. I’m also in Canada where everything seems to cost more.
The shelves were $44 each and the table top was about $25. Overall I am thrilled and have been spending a lot of time in the basement lately!
Last Updated on
